
How to configure VTiger with Monema
Integrations
The PBX service can be connected to VTiger CRM, both in the cloud version at vtiger.com and in the version hosted on your own server.
Functionalities offered
The functionalities it offers are the following:
- Call forwarding from VTiger with a single click on the contact’s phone number.
- Informative popup of received calls indicating the contact, opportunity or organization from whom the call is being received.
- Record of calls made with a link to the recording of the call.
- Reception of calls in the PBX terminals with the name of the contact obtained from VTiger.
Installation of the VTiger connector
1. Requirements
- VTiger hosted on vtiger.com or free version hosted on your own server version 6 or higher. It is important that the version of the web server hosting VTiger is 7.0.
2. Configuration on vtiger.com
If your VTiger installation is hosted on the vtiger.com subscription service, please follow the steps below. Otherwise continue to section 3.
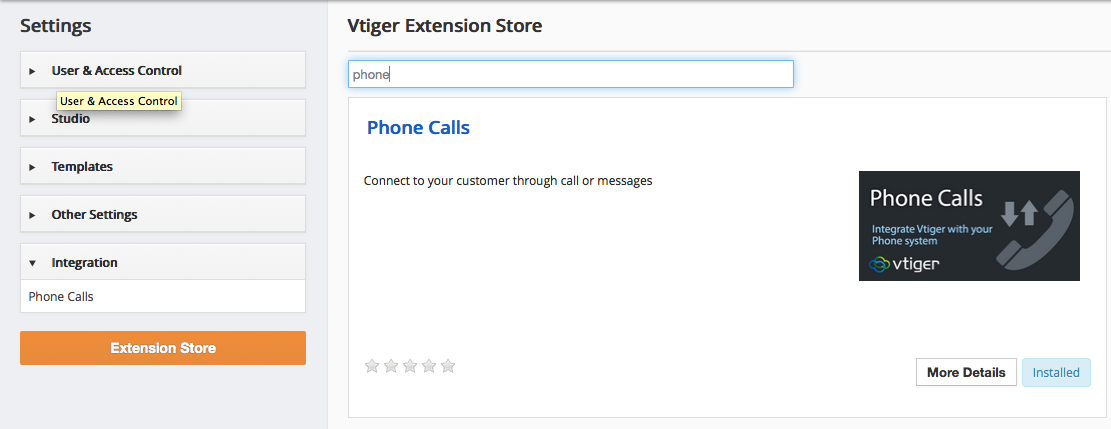
- Access the CRM Settings > Extensions Store and look for the “Phone Calls” extension. Click on “Install”.
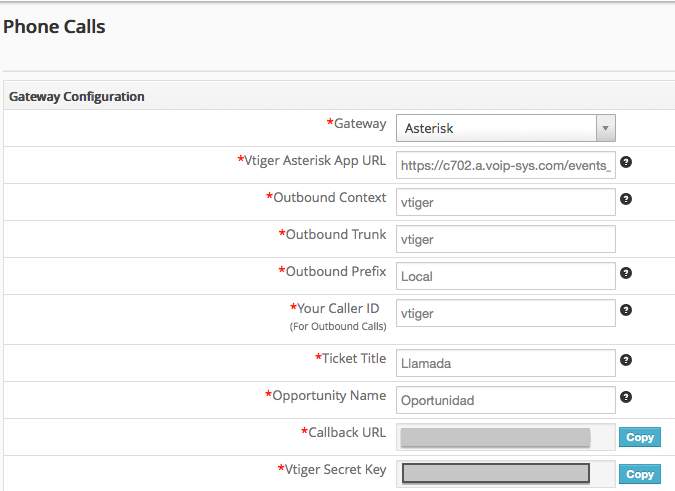
- Once installed access the section CRM Settings > Integrations > Phone Calls and configure the following values:
- Gateway: Asterisk
- VTiger Asterisk App URL: Enter the address that appears in the “Vtiger Asterisk Web URL” section of the VTiger configuration in your control panel. ( ex: https://c702.a.voip-sys.com/events_manager/vtigerCallback?c=1-1& ).
- Outbound Context: vtiger
- Outbound Trunk: vtiger
- Outbound Prefix: Local
- Your Caller ID: vtiger
- Ticket Title: indicate a label that will be assigned to the tickets you create from the call reception popup.
- Opportunity Name: Indicate a label that will be assigned to the contacts you create from the call reception popup.
- Callback URL and Vtiger Secret Key: write down these values as you will need them to configure the VTiger section of your PBX.
- Access the “Manage Users” section and, for each VTiger user you wish to configure with the control unit, follow these steps:
- Click on “Edit” to modify the user fields.
- Indicate in the “Asterisk Configuration > Asterisk Extension” field the number of the PBX extension associated with this user.
- Indicate in the “Receive incoming calls” box if the VTiger user will answer incoming calls or not. If you deactivate it the incoming calls popup window will not be shown.
Once these steps have been carried out, you only need to configure the integration of VTiger in your control panel of the virtual PBX. Go to step 4 to see how to do this.
3. Configuring VTiger in your own accommodation
To configure the integration with VTiger if it is hosted on your own server (outside vtiger.com), follow these steps:
- Download the PBXManager module from the following link.
- Access the “CRM Settings > Studio > Module Manager” section and click on “Install from Zip”. This link is located at the bottom of the page.
- Upload the PBXManager-2.2.zip file downloaded in step 1 and click on “Upload”.

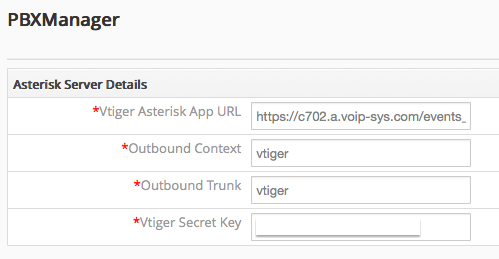
- Once installed, access the “CRM Settings > Integration > PBXManager” section and click on “Edit”. You will have to fill in the following fields with these values:
- Vtiger Asterisk App URL: indicate the address that appears in the “Vtiger Asterisk URL Web” section of the VTiger configuration in your control panel. ( ex: https://c702.a.voip-sys.com/events_manager/vtigerCallback?c=1-1& ).
- Outbound Context: vtiger
- Outbound Trunk: vtiger
- Vtiger Secret Key: write down these values as you will need them to configure the VTiger section of your PBX.
- Access the “Manage Users” section and, for each VTiger user you wish to configure with the control unit, follow these steps:
- Click on “Edit” to modify the user fields.
- Indicate in the “Asterisk Configuration > Asterisk Extension” field the number of the PBX extension associated with this user.
Now you will have to configure the integration of VTiger in the control panel of the PBX following the help of the next step.
4. Configuring VTiger in the control panel of the PBX
- Access the Integrations section and click on “Configuration” in the VTiger module.
- Fill in the following fields:
- VTiger Type: Indicate vtiger.com if you have a VTiger account on that service or “Own Hosting” if you host it on your own server.
- VTiger URL: Indicate the access URL to your VTiger service (e.g. https://xxxxxx.od1.vtiger.com or your own if you are installing it on your server).
- VTiger Secret Key: Indicate the password shown in the VTiger integration configuration “VTiger Secret Key” and that you wrote down in the previous steps.
- Configured extensions: select the extensions to be used with VTiger.
- Show call recordings in VTiger: if you have call recording activated in the PBX and you want them to be shown in the list of calls in VTiger check the box.
- Get VTiger caller ID: if you activate this, when you receive a call on your PBX terminals you will see the name of the customer calling you obtained from the VTiger data. To activate this functionality you need to indicate a user name with API access permissions and the API access key (you can consult it in the “Access Key” field in CRM Settings > Manage Users and by clicking on the user).
- Activate the VTiger module by clicking “ON”.
